Docker Multi Host Networking with Consul and Vagrant
Mar 1, 2016 · 4 minute read · Commentstech

Docker networking is progressing and it recently released its 1.0 release. Initially docker mostly used on a single host. With the high usage and complex use cases, the requirement of multi-host networking emerged and people have used many different ways to achieve it. In this article, let’s explore docker networking.
By default, docker provides the following networks. You can inspect them with the following command
$ docker network ls
NETWORK ID          NAME                DRIVER
7fca4eb8c647        bridge              bridge
9f904ee27bf5        none                null
cf03ee007fb4        host                host
You can refer docker networking for a comprehensive guide to understand docker default networking.
Docker Multi Host Networking
Lets look at what docker proposes for multi-host networking. There are several ways to achieve the docker multi-host networking. In addition to basic network bridge, host and null you can use docker’s overlay network to connect multiple hosts. In order to create an overlay network you need to have a key value store configured and setup.
There are different key value stores that can be used with docker overlay networking. Docker libkv supports key-value stores such as Consul, Etcd, Zookeeper (Distributed store) and BoltDB (Local store). In this tutorial let’s use Consul. Overlay network connects multiple hosts and your containers will be connected to each other through overlay network as if they are on the same network. Docker used VxLAN internally to provide this functionality to create virtualized network layer.
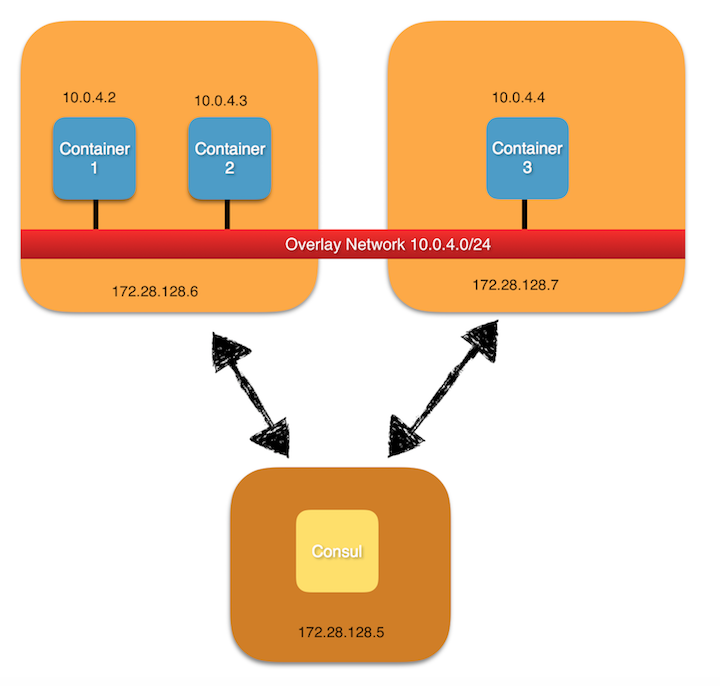
Overlay networks provide a setup usually as the following the figure. It has 3 hosts and we use one of them to bootstrap Consul Key-value store. And other two hosts are connected by overlay network. All the containers are instantiated with overlay networking options so they connect to overlay network.
I will be following this tutorial from Docker documentation. But let’s do it this time with vagrant boxes.
You need to have these installed on your machine to begin. All of the software are single click installable without much hassle.
1) Vagrant and Virtualbox
Let’s start,
- Clone the Vagrant files to you local machine.
git clone https://github.com/shelan/vagrant-ubunut-nodes
- Navigate to “vagrant-ubunut-nodes” folder and run following command. It will spawn 3 virtual box machines with ubuntu 15.10. Using a newer ubuntu version is important as docker networking needs a Linux kernel >= 3.16
vagrant up
- Usually we use docker-machine to create virtual box instances also. But in this tutorial, I am showing how we can add existing VMs to docker-machine and manage them through docker-machine.
In this, we will be using the generic driver of docker-machine. you can pass following options to it.
--generic-IP-address: **required** IP Address of the host.
--generic-ssh-key: Path to the SSH user private key.
--generic-ssh-user: SSH username used to connect.
--generic-ssh-port: Port to use for SSH.
Since we are using Vagrant you can use vagrant user and private keys from here
- Lets configure key value store first
docker-machine create --driver generic --generic-ip-address=172.28.128.5 --generic-ssh-key=<yourpath to private key folder>/ida_rsa --generic-ssh-user=vagrant mh-keystore
then run
$  docker $(docker-machine config mh-keystore) run -d \
    -p "8500:8500" \
    -h "consul" \
    progrium/consul -server -bootstrap
- Now it is time to install docker-engine in other hosts. Additionally, we need to configure those docker-engines to the key value we started in 172.28.128.5 machine.
$ docker-machine create --driver generic --generic-ip-address=172.28.128.6 --generic-ssh-key=<yourpath to private key folder>/ida_rsa --generic-ssh-user=vagrant --engine-opt=cluster-store=consul://172.28.128.5:8500 --engine-opt=cluster-advertise=eth1:2376 mhs-demo0
docker-machine create --driver generic --generic-ip-address=172.28.128.7 --generic-ssh-key=<yourpath to private key folder>/ida_rsa --generic-ssh-user=vagrant --engine-opt=cluster-store=consul://172.28.128.5:8500 --engine-opt=cluster-advertise=eth1:2376 mhs-demo1
In the above commands, you can use consul://$(docker-machine ip mh-keystore):8500 without hardcoding the ip of the key value server as well.
You can issue the command docker-machine ls to inspect the running machines.
- Lets change our environment to vm2 (mhs-demo0) host.
$ eval $(docker-machine env mhs-demo0)
Lets create an overlay network
docker network create --driver overlay --subnet=10.0.4.0/24 my-netInspect the running network
docker network ls
You might be able to see that there is a new network called my-net with driver type overlay is created. You can create many networks and make sure to change the subnet suitably to avoid collisions.
This newly created network is visible in both hosts. If you need to inspect what is being stored in the key value store you may navigate into.
http://172.28.128.5:8500 which provides you a GUI for consul key value store.
Now Let’s run a container in mhs-demo0
docker run -it --net=my-net ubuntu:trusty /bin/bash
Get the IP address of the container by issuing the command ifconfig.
In another terminal, you might run another container. First let’s change the environment to mhs-demo1
$ eval $(docker-machine env mhs-demo1)
Now create another container with the overlay network
docker run -it --net=my-net ubuntu:trusty /bin/bash
Now try to ping the first container IP address (assume the first container is 10.0.4.2).
ping 10.0.4.2
And you should be able to ping between containers successfully. So now the multi-host networking works and basic setup is done to run your own experiments.